Showing posts with label Asian. Show all posts

Thursday, September 6, 2012

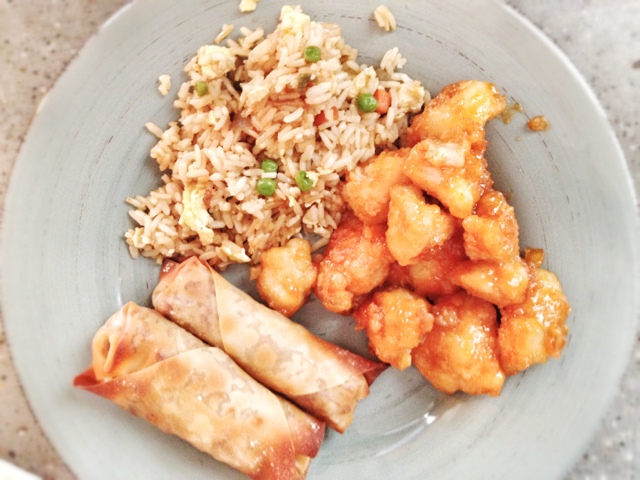
Baked Sweet and Sour Chicken with Fried Rice

I have had some SERIOUS happy cooking mojo lately.


This is another pinterest recipe gone good.

And other than being a little time consuming, it was SO easy. I'm definitely putting it on my "recipe staples" list.

We've been updating our laundry room this week...

And by updating I mean we poured concrete counter tops, ripped out and patched, mudded, and sanded drywall, painting, etc. etc.... bla bla bla.

And by WE I mean my husband did almost all of that by himself... (I'm pregnant...I have excuses.)


So needless to say I have been NOT cleaning. And NOT doing laundry.

Other than playing with my adorable baby kid all day, I'm starting to get kind of bored.


Solution: Make everything I want from Pinterest.
You should do it too.

But first, make everything from my blog. :)

Baked Sweet and Sour Chicken with Fried Rice

Ingredients:
3 chicken breast, cubed
salt and pepper
1 cup cornstarch
2 eggs, beaten
1/4 cup olive oil

Sauce:
3/4 cup sugar
4 TBS ketchup
1/2 cup distilled white vinegar
1 TBS soy sauce
1large garlic clove, minced or grated

Fried Rice:
2-3 cups cooked brown rice
3 TBS olive oil
1 cup frozen peas and carrots, thawed
1 small onion, chopped
2 garlic cloves, minced
2 eggs, slightly beaten
1/4 cup soy sauce

Directions:
For the Chicken:
Preheat oven to 350.

Season the cubed chicken with salt and pepper. Coat completely with cornstarch and then dip in the eggs. Heat the oil in a skillet and cook the chicken until browned but not COMPLETELY cooked through.

Mix all of the sauce ingredients in a bowl. Pour the chicken in a greased 9x13 dish and pour the sauce mix evenly over the top of the chicken

Bake for an hour, flipping the chicken every 15 minutes. (This is the relatively time consuming part.)

For the Fried Rice:
Heat the oil in a skillet over medium/high heat. Saute the peas, carrots, onions, and garlic until softened. Lower the heat to medium, push the vegetable mixture to one side and scramble the egg in the center of the pan. Once the egg is cooked add the rice and soy sauce and mix everything together. Fry until completely heated through. 

This is the first time that I actually made fried rice successfully. And by successfully I mean it tasted like the kind you get at a restaurant. 

Recipe by: Life as a Lofthouse


I paired this with baked egg rolls....YUM-O.

Friday, August 31, 2012

Baked Pork Egg Rolls

I made the most delicious food this week.


Each new recipe I tried not only was a success, but was so good I wanted to make it again and again and again.

That doesn't always happen you know.


Sometimes (or you know, every single night) I spend hours on pinterest pinning and reading all these beautiful and delicious recipes....and then I never make them.

Or I make them and they turn out like crap.
Or I make them, but change all of the ingredients and they turn out delicious!


On that note...

BIGGEST INTERNET RECIPE PET PEEVE EVER: When someone comments on a recipe that it was so gross and they'd never make it again or it was ridiculously hard and impossible even for a genius....BUT THEY DIDN'T FOLLOW ANY OF THE DIRECTIONS!

OR

THEY CHANGED HALF THE INGREDIENTS!

Ok, listen. You have all the right in the world to use whatever ingredients or technique you so choose...
BUT if someone posts a recipe saying "this is good if you use this and do it this way"....you really don't have the right to change everything and then give the original recipe a bad review.

This hasn't happened to me.

But every time I read a recipe I read the comments to see what the general feedback is and there's always that one person that's like "Well I changed the first five ingredients...and I didn't cook it as long as you said. I definitely will not recommend this recipe to anyone!"


So please...change all the ingredients if you want (I do it all the time.) Experiment with cooking time. Change it however you want...but know that if it turns out super disgusting, it might not be the ORIGINAL recipes fault.

I'm just saying....


Ok I'll get off my little rant. I started out trying to tell you that I always read pinterest recipes and never try them. And this week all the ones I tried were AMAZING.

Starting with these baked egg rolls.

My husband and I rarely eat any fried food. But I have a thing for asian food, specifically all the asian food that is fried.

So a recipe that is baked (and therefore must be in the "incredibly healthy"category) is worth trying.


Also, unlike Spring Rolls these egg rolls are REALLY easy to make. (I'm not dissing the spring rolls, but those took forever to roll.) It just takes a little water on the corners of the egg roll wrappers and they roll right up. 


The original recipe didn't include any pork, but I wanted the egg rolls to be a bit more filling so I decided to add ground pork.

Super great addition!

I'm usually not a huge fan of egg rolls with just cabbage.
Egg rolls with pork...YES.


Serve with rice and dipping sauce. I made a 50/50 soy/rice vinegar dipping sauce and bought a bottle of sweet chili sauce (my fav!)

Baked Pork Egg Rolls

Ingredients:
1 lb ground pork
1 bag cole slaw
1 pkg egg roll wrappers
Kikkoman garlic teriyaki sauce
soy sauce
3-4 cloves garlic, minced
1/4 tsp ground ginger
salt and pepper
cooking spray

Directions:
Preheat oven to 375.

Put the coleslaw in a microwave safe bowl with a very small splash of water and microwave for 5 minutes. Drain any extra liquid.

 Brown the ground pork. Season and pour a splash of the garlic teriyaki in right before it's completely cooked (I just poured some in, it was probably a couple tablespoons at most) just so it's slightly flavored but not completely wet.

In a large bowl mix the cooked ground pork, heated coleslaw, garlic, ginger, a little salt and pepper, and a splash of soy sauce. Place a bit of filling in the center of each egg roll wrapper. Keep a small bowl of water next to you and with your finger rub a little water around each corner. Fold three corners in and then roll towards the remaining corner. Make sure the inside of that last corner has water on it so when it wraps around it will stick to the roll.

Place the egg rolls on a greased baking sheet and spray the tops of the egg rolls with cooking spray.

Bake 15 minutes and then flip the egg rolls. Bake an additional 10-15 minutes.
Let cool a few minutes before serving. Serve with sweet chili sauce or soy.

These were best served fresh, although I had a few left over that I reheated the next day and they tasted fine. The wrapper just wasn't as crispy.

Recipe adapted from: Joyful Abode


Tuesday, May 15, 2012

Spring Rolls

I usually have spring rolls that are cooked; the insides all warm and delicious and the outsides crispy and fried. Well these are the opposite. The vegetables are uncooked and they are served cold.


But trust me in this, they are surprisingly refreshing and extremely tasty. The perfect appetizer to an asian meal.

I made these off a memory of eating them 6 months ago AND three different recipes. I don't even know who to give credit to. My friend Fiona probably deserves all the credit actually because I ate them at her house. Regardless of how they made their way into my kitchen, they were super delicious.


The rolls are filled with vegetables, but also with rice sticks. This pasta sits for a few minutes in hot water until soft. I tossed the veggies and pasta with a little soy before wrapping them. 

I made a garlicky, asian sauce to dip the rolls in. We also dipped them in (store bought) sweet chili sauce. Either way was tasty.

So next time you're making asian food, pick up some ingredients for these rolls. It's a little time consuming, but way worth it!

Spring Rolls

Ingredients:
1/4-1/2 small cabbage, sliced into eatable size portions
3 medium carrots, julienned or shredded
1-2 tbs fresh minced ginger
4 oz rice sticks (a little over half a package)
Cilantro (amount to preference)
4 tbs soy sauce
1 package rice paper

Directions:
Cook the rice sticks according to the directions on the package. In a large bowl combine the first six ingredients.

The best way to make these rolls is to set up an assembly line. You'll need a large plate filled with warm water, a dry plate, and a serving plate. One roll at a time, dip the rice paper in the warm water and let soak for about 30 seconds, until it is pliable but not completely soft. Move it to the dry plate and let it sit for another 30 seconds or until it is completely soft. Place a couple spoonfuls of the veggie/rice mixture in the top third of the paper. Starting at the top, roll the mixture one turn. Turn the sides in and then finish the roll. Repeat until you are completely out of the mixture. 

This process was a little time consuming, and I didn't perfect it till the last plate of spring rolls. It takes some time to get the best technique for creating a tight roll. It really doesn't matter if they are perfect, it only really matters that they're delicious.

I found that the rolls were best served after being chilled for an hour or two.

You need to make these sometime in your life.

Thursday, May 10, 2012

Asian Ground Beef

I'm always looking for different recipes that use ground beef. I feel like ground beef is often times so...blah. Spaghetti, hamburgers, tacos...blah blah blah.


Those meals are normal -- thoughtless even. Don't get me wrong...those meals are on my dinner table more often than not. But sometimes I want my ground beef to be different.

Give me some variety!


Well here it is. I found a ground beef recipe that isn't your everyday meal.

I found this recipe on pinterest, but didn't have every ingredient on hand. So I just adapted it to my tastes. It turned out really good!

Just brown some beef (with lots of garlic of course.) Sauté the beef with the sauce. Serve over rice. (I kind of stink at making rice so I buy those "steam in the microwave" bags. So worth it.)

And hey, why not toss some cilantro on top. Who says you can't have it all? 

Asian Ground Beef

Ingredients:
1 lb ground beef
1/3 cup brown sugar
1/2 cup teriyaki sauce
3 cloves of garlic, minced
1 tsp fresh ginger, minced
1 tsp crushed red pepper
salt and pepper
cilantro (optional)

Directions:
In a large skillet, brown hamburger with garlic. Season with salt and pepper. Drain the fat and then add brown sugar, teriyaki, ginger, and red pepper. (I mixed up the sauce before adding it to the beef.) Simmer for a few minutes to blend the flavors. Serve over rice and top with cilantro.

Adapted from: Lizzy Writes

This should be your new everyday meal.